![]()
Syntheogen Guide
Loop Steps
Updated February 10, 2015
The LOOP STEPS dialog allows you to edit all the patterns in the current loop from one location:

LOOP STEPS dialog
A loop is displayed here by pressing the LAST LOOP button on the MAIN dialog, or by selecting the loop in the ALL LOOPS dialog and pressing EDIT. The LOOP STEPS, LOOP MIX, and LOOP EFFECTS dialogs provide different ways of editing the same loop.
Steps view
On the left, the steps view displays the patterns in all the tracks referenced by this loop. This view is analogous to the mix view on the LOOP MIX dialog; the same elements are displayed, in the same order, with the same numbers and colors. To the left of each pattern is a numbered heading; long-tap this heading to open the track in the TRACK SYNTH dialog. Zoom into or out from the steps view with standard pinch gestures.
Step columns and rows
Every loop contains one or more guides that divide the patterns horizontally into steps. A different guide can be activated by pressing NEXT GUIDE. Guides are created or removed by pressing EDIT GUIDES.
Just as a step's horizontal position defines its placement in time, its vertical position defines its location in the scale assigned to the track. By default, only enough rows are displayed in each element to show the current pattern. To show all rows in the entire scale, tap the numbered element heading once; then tap again to return the element to its collapsed state.
Editing steps
Steps can be set or unset by tapping them. They can be moved by long-tapping and dragging them:

Dragging a set step
The properties of a set step — including its start position, length, pitch, level, and ties — can be edited with the NOTE PROPERTIES dialog, which is displayed by long-tapping and then releasing the step:
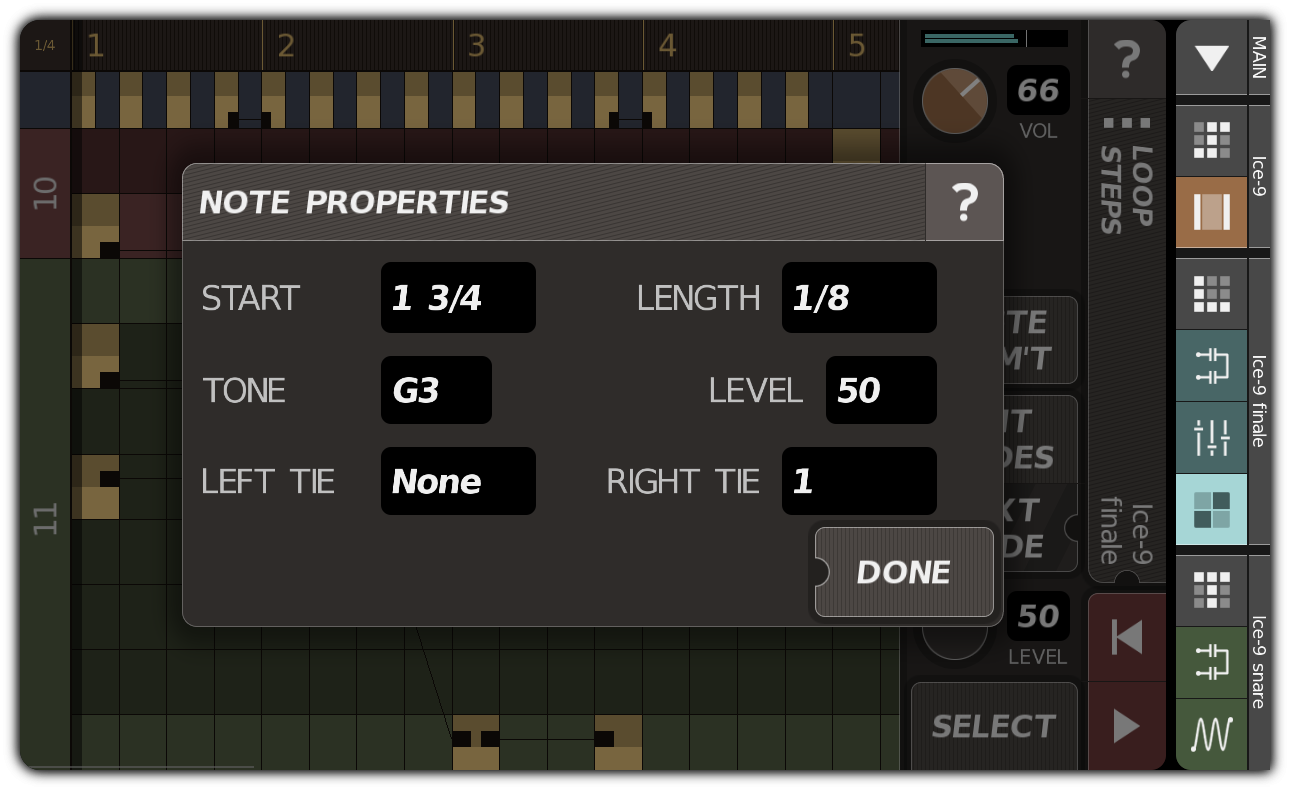
NOTE PROPERTIES dialog
Note positions and lengths can be specified with improper or mixed fractions, such as 4/3 or 3 1/2.
Step levels
Each step has its own level, allowing certain notes to be accented while others are played more softly. This level is represented by the bright portion within the step's rectangle.
When a step is first set, its level is determined by the current value of the LEVEL knob; after, the level can be edited by selecting the step and adjusting LEVEL. It is possible to create steps with zero volume; these produce no sound on their own, but when tied to other steps, they create 'swells' that rise from or fall to silence.
Loop playback
Every loop has a repeat length that determines the horizontal range displayed in the steps view. Each track or pattern has its own length as well, and when a pattern is shorter than some loop that references it, the pattern repeats to fill the loop length. In the steps view, these repetitions are marked with repetition dividers, dark vertical lines somewhat thicker than the grid lines that separate steps.
A thick semi-opaque line shows the playback position. The ruler at the top of the view marks positions within the loop, as measured in beats. The playback position can be set by tapping the ruler:

Playback position and repetition divider
Command controls
Various controls are displayed to the right of the steps view, with different controls appearing when different operations are performed on the view:
LOOP STEPS dialog with no selection
The SELECT button at the bottom is always visible; this button enables or disables the select mode used to modify steps and elements in the loop. When you first display the dialog, SELECT is unlit, and no selection is active. In this situation, the following controls are visible:
| PASTE ELEMENT | Displays the PASTE ELEMENT dialog, which you can use to add an element to the loop. |
| EDIT GUIDES | Displays the GUIDES dialog, which you can use to create, delete, or select guides. |
| NEXT GUIDE | Switches to the next guide. If there is no other guide, the button will be disabled. |
| LEVEL | Sets the level to be applied when a new step is set. As explained above, steps are allowed to have zero levels. |
Selecting individual steps
If you press and release the SELECT button, it will light; you will then be able to select steps by tapping them, or select elements by tapping their headings:

LOOP STEPS dialog with single step selected
After a step is selected, the following buttons and controls become visible:
| TOGGLE STEP | Toggles the selected step. |
| RIGHT TIE | Adds a right tie to the selected step, or increments the right tie mark if one already is set. If the selected step is unset, this operation sets it. |
| LEFT TIE | Adds a left tie to the selected step, or increments the left tie mark if one already is set. If the selected step is unset, this operation sets it. |
| CLEAR TIES | Removes all ties from the selected step. |
| LEVEL | Changes the level of the selected step, setting the step first if it is unset. As explained above, steps are allowed to have zero levels. |
Tapping the SELECT button again unlights it, disabling the selection mode.
Selecting elements
Numbered loop element headings are shown at the left edge of the view. When SELECT is lit, tapping a heading selects the element:

LOOP STEPS dialog with element selected
When an element is selected, these controls appear:
| PASTE ELEMENT | Displays the PASTE ELEMENT dialog, which you can use to add an element to the loop. If you copied an element before pasting, that element's properties will appear in the dialog; otherwise, default values will be shown. The new element can be pasted above, below, or over the selected element. |
| COPY ELEMENT | Copies the selected loop element. |
| DELETE ELEMENT | Deletes the selected element. |
| LEVEL | Adjusts the level of the selected loop element, just like the LEVEL knob on the LOOP MIX dialog. |
Selecting step ranges
Finally, it is possible to select a range of steps by lighting the SELECT button, tapping one step to select it, holding the SELECT button down, and then tapping another step in the same element; this selects the columns containing the two steps, along with all steps between them:
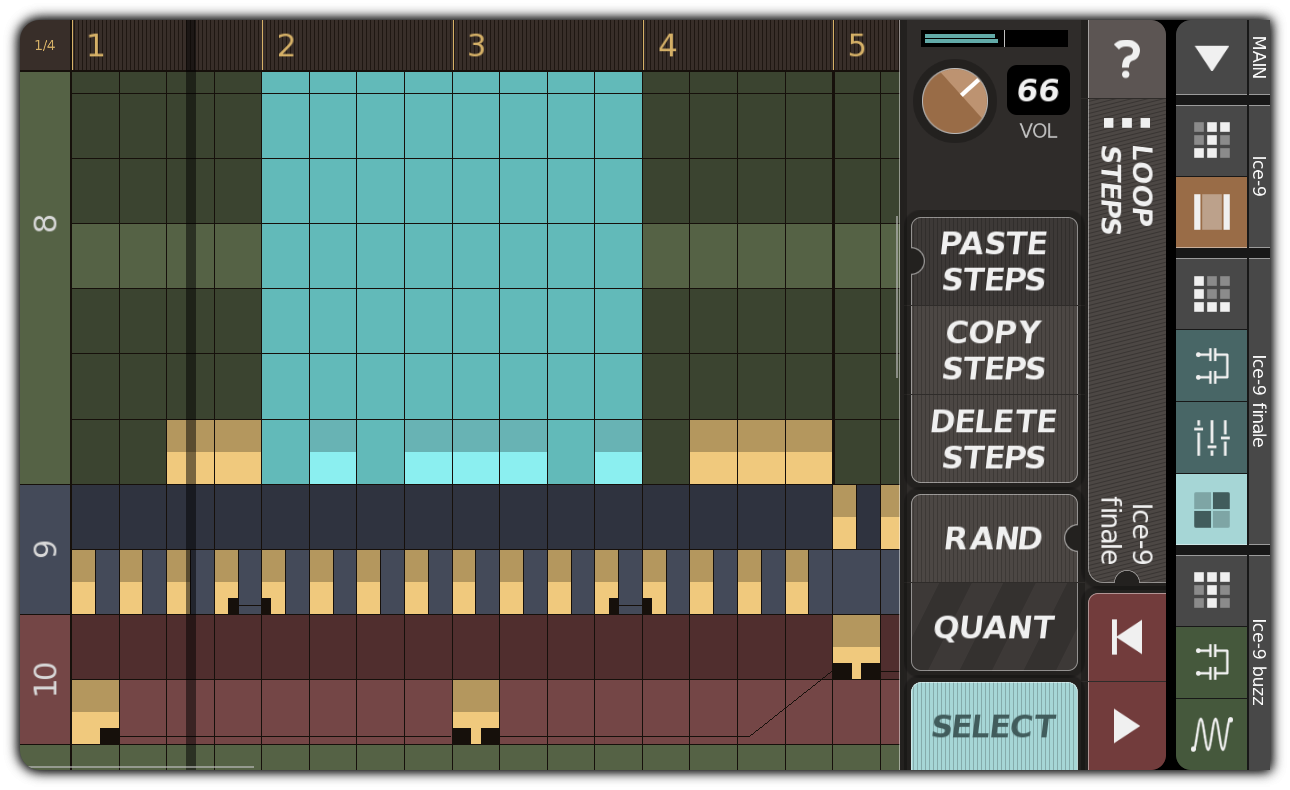
LOOP STEPS dialog with step range selected
When this is done, the following buttons appear:
| PASTE STEPS | Pastes any copied steps into the selected range, repeating the copied pattern as necessary to fit. |
| COPY STEPS | Copies all steps that start in the selected range. |
| DELETE STEPS | Unsets all steps that start in the selected range. |
| RAND | Displays the RANDOMIZE STEPS dialog, which you can use to randomize the pitch values of the steps in the selected range, or the step positions, or both. |
| QUANT | Displays the QUANTIZE STEPS dialog, which you can use to align the positions and lengths of the steps in the selected range to the active guide. |
This video shows one step range being copied and pasted into another to fill an entire pattern:
Selecting a step range
Other controls
Above the command controls you will see the VOL controls that appear on all loop and track edit dialogs.
To the right is the title bar, which shows the name of the loop being edited. Tapping the title bar displays the LOOP PROPERTIES dialog.
Below the title bar is the RESTART button, which starts or restarts playback from the beginning of the loop, and the PLAY button, which alternately starts and pauses playback.